SEPA direct debit and mandates
Creating a new SEPA direct debit
- Selecting your ordering account
- Working with a single mandate
- Working with group of mandates
- Enable global debit (optional)
Overview of Mandate management
Managing your mandates
- Managing your groups
- Setting the sequence from first to next
- Edit your mandates (adding amendments)
- Import and export your mandates
Creating new or migrated mandate
- Define mandate information
- Define Debtor information
- Define Creditor information
- Define mandates defaults and a personal note
How to access
- Select the Transactions tab.
- Select New > SEPA direct debits in the Navigation pane. As a result the SEPA direct debits area is displayed.
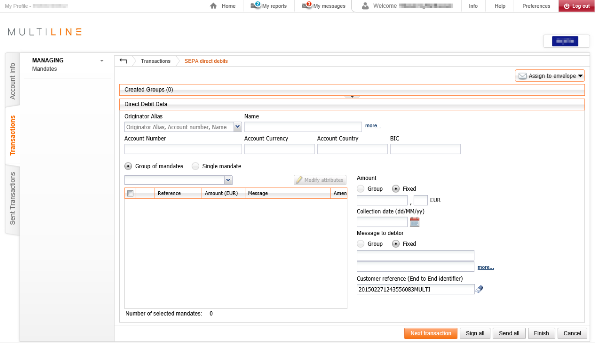
Creating a new SEPA direct debit
>Selecting your ordering account
![]()
Select the Originator Alias from the list or search by entering the alias or IBAN. All other fields will be automatically filled in.
Working with a single mandate
- Select a mandate reference from the dropdown list.
Note: If you have more than 200 mandates then you have to type leading characters in the Mandate reference dropdown list to display the mandate that you want to select. - Insert the Amount for this collection or use the default amount if configured.
- Insert a mandatory Requested Collection date (by using the calendar tool). The date depends on the payment scheme (B2B or Core), the payment type (recurrent or one-off) and the sequence (first, next and final). This information can be found on the left side where you have selected your mandates.
- In the Core scheme
 , you must send your collections at least 6 days (in case of First, One-off) or 3 days (for Next or Final) before your requested collection date.
 - For the B2B scheme
 , you must send your collections at least 3 day before the requested collection date.
- In the Core scheme
- Insert a Message to debtor for the collection that is using the mandate. As a result the Message to debtor defined in the mandate is overruled by this message.
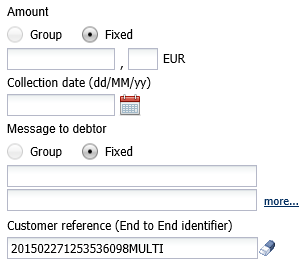
- Insert a Customer reference (End to End identifier) or use the generated reference.
Note: your bank has to only be notified once about an amendment. If you create a SEPA direct debit that includes a mandate with an amendment (illustrated with the icon ![]() ) the amendment will automatically be removed from the mandate (not from your newly SEPA direct debit). If you remove the created SEPA direct debit from your transactions before sending it to your bank or the bank rejects the SEPA direct debit, you will need to recreate the amendment.
) the amendment will automatically be removed from the mandate (not from your newly SEPA direct debit). If you remove the created SEPA direct debit from your transactions before sending it to your bank or the bank rejects the SEPA direct debit, you will need to recreate the amendment.
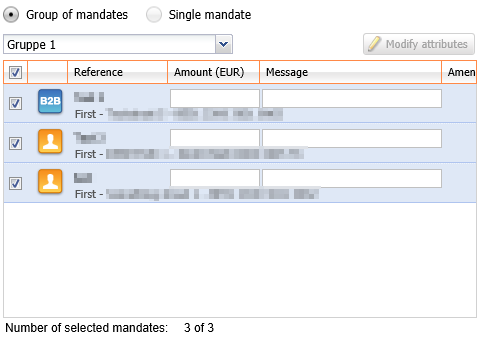
Working with group of mandates
If you have not yet created any groups of mandates, only the option ‘Single mandate‘ will be available (how to group your mandates).
- On the left side, select a group of mandates from the dropdown list. As a result your mandates in that group will be listed.
Notes:
- Use the checkbox to include/exclude the mandates from your SEPA direct debit
- The text field ‘Amount‘ should only be used and is mandatory when (on the right side) you choose a group amount
- The text field ‘Message‘ should only be used when (on the right side) you choose a group message to debtor
- On the right side, following options are available:
-
Amount:
- Group: insert the percentage that is applied to the amount each individual mandate in the group.
- Fixed: insert the amount that is applied to every collection of the selected mandates, default amounts of your mandates are overruled.
- Insert a mandatory Collection date (by using the calendar tool). The date depends on the payment scheme (B2B or Core), the payment type (recurrent or one-off) and the sequence (first, next and final). This information can be found on the left side where you have selected your mandates.
- In the Core scheme
 , you must send your collections at least 6 days (in case of First, One-off) or 3 days (for Next or Final) before your requested collection date.
 - For the B2B scheme
 , you must send your collections at least 3 day before the requested collection date.
- In the Core scheme
-
Message to debtor:
- Group: use this option to encode a message for every debtor individually. You can enter this message in de debtors list on the left side.
- Fixed: use this option to encode the same message for all your debtors
-
Amount:
Note: your bank has to only be notified once about an amendment. If you create a SEPA direct debit that includes a mandate with an amendment (illustrated with the icon ![]() ) the amendment will automatically be removed from the mandate (not from your newly SEPA direct debit). If you remove the created SEPA direct debit from your transactions before sending it to your bank or the bank rejects the SEPA direct debit, you will need to recreate the amendment.
) the amendment will automatically be removed from the mandate (not from your newly SEPA direct debit). If you remove the created SEPA direct debit from your transactions before sending it to your bank or the bank rejects the SEPA direct debit, you will need to recreate the amendment.
Enable global debit (optional)
- Encode your SEPA direct debit and click on the button Next transaction
- Click on Created groups. As a result the created groups will be displayed
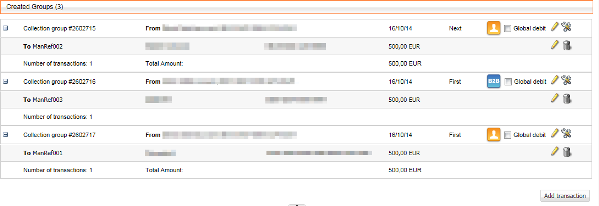
- Use the checkbox Global debit to enable or disable the option.
Creating and managing mandates
Overview of Mandate management
How to access
To access Mandate management, go to the tab Transactions > Click in the left navigation panel on Mandates.
![]()
Window overview
- Use the tabs Mandates and Groups to switch between a single mandate and group view.
- In Group filter you can select one of your created. This way only the mandates of that group will be displayed.
- You can click on the arrow down button in any column to display the sorting and filter option. The Filter is only available in the column ‘Scheme‘ and ‘Sequence‘.
- In the column Group you can verify to which group(s) the corresponding mandate is assigned
- Icon to display the scheme of the mandate:
-
Core mandate
-
B2B mandate
-
- In the column Amendment an icon
 will be displayed if the mandate has an attached amendment.
Managing your mandates
Managing your groups
By assigning mandates to groups, you create a useful tool to prepare and simplify the large number of mandates.
Assigning mandates to groups
![]()
- Select in Manage mandates the mandate(s) you would like to group, using the checkbox in the first column.
- Click on the Group of mandates. As a result the Group of mandates pop-up window appears underneath the button.
Here you can create a new group or assign mandates to existing groups.- To create a new group, you type the name of your new group.
- Click on Create group. As a result the newly created group will appear in the list above.
- Select one or more groups (using the checkbox) to which you would like to assign the mandate(s).
- Click on Assign to selected group(s) to assign the mandates to the selected group(s)
Note: empty groups are automatically removed
Removing mandates from groups
![]()
- In Manage mandates click on the tab Groups to display the groups and their containing mandates.
- Select the mandates you would like to remove from this group, using the checkbox in the first column.
- Click on the button Remove mandate(s) from the group.
Note: empty groups are automatically removed
Renaming groups
![]()
- Click in Manage mandates on the tab Groups to display the groups and their containing mandates.
- Click on the current name of the group. As a result, the field will become editable. Change the current name into the new name and hit enter.
Setting the sequence from first to next
If a mandate with sequence First was successfully executed, it must be changed to sequence Next. It is important to carefully manage this, to prevent that files are rejected by the bank.
In Multiline you can easily change the sequence of all mandates from First to Next.
![]()
- Select the mandates of which you would like to change the sequence to Next.
Tip: you can filter out mandates in the columns - Click on Change to Next sequence.
- A confirmation will be displayed. Click Yes to confirm your action.
Note: this option is only available if all the selected mandates have sequence First.
Edit your mandates (adding amendments)
A debtor might request a change in his mandate (adjust his account-number, name or address). These changes must be initiated by the debtor and it strongly recommended having this confirmed by signed letter or mail (to avoid confusion in the future).
When you are editing your mandates, Multiline will automatically suggest to add an amendment.
- To edit your amendment go to mandate management and open the mandate you want to update/modify
- Edit the value that you want to change
Tip: We recommend to write in the Note the old value - Click on Save. If an amendment is required, a pop-up will appear. It will give you the option to add an amendment.
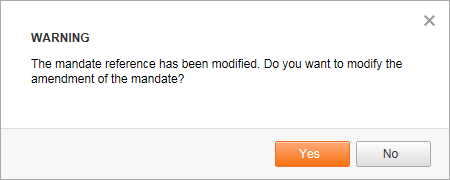
- No: no amendment is created (which is not recommended)
- Yes: the amendment window will be displayed with the old and the new value
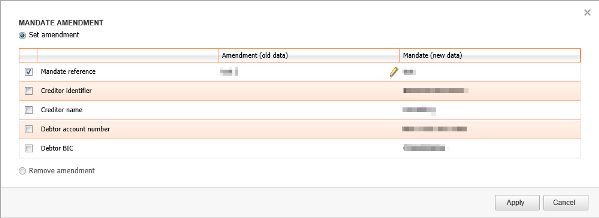
Note: your bank has to only be notified once about an amendment. If you create a SEPA direct debit that includes a mandate with an amendment the amendment will automatically be removed from the mandate (not from your newly SEPA direct debit). If you remove the created SEPA direct debit from your transactions before sending it to your bank or the bank rejects the SEPA direct debit, you will need to recreate the amendment. This is way it‘s recommended to add changed values in the field ‘Note‘.
Import and export your mandates
By exporting and importing your mandates you can migrate all your existing mandates to another user or view it using a spreadsheet application like Excel.
Exporting your mandates
- To export your mandates, go to ‘mandate management’ and click on Download all mandates in the left menu
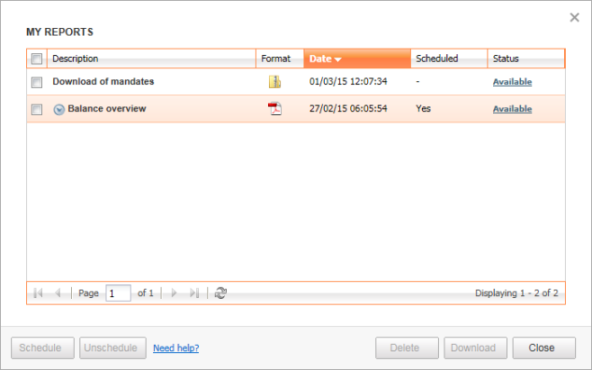
- To download your export, go to My Reports in the top menu
The description of your file in My reports will be “Download of mandates”
Remarks:
- The export might take a while, depending on the amount of available mandates
- The export will only remain in My reports for a limited amount of time. It is therefore advised to store it on your computer
- In case you assigned mandates to groups, the groups will not be exported
Importing your mandates
- To import your mandates, go to ‘mandate management’ and click on Upload mandates in the left menu

- Use the Browse button to open the file you downloaded while Exporting your mandates
- Choose between the options
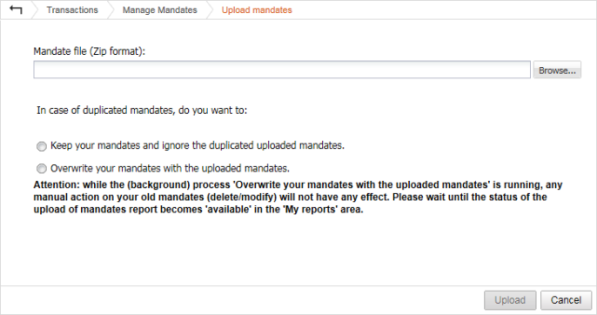
- Keep your mandates and ignore the duplicated uploaded mandates
- Overwrite your mandates with the uploaded mandates
Open your mandates in Excel
By opening your mandates in Excel you can perform various administrative tasks with your mandates.
- Create an export of your mandates and save it on your computer
- Open the ZIP file you downloaded from Multiline and place the file “multiline_download_of_mandates[ID].xml” in another folder (to extract it from the ZIP file)
- Open your Spreadsheet application (e.g. Excel) and choose File > Open > Choose to view All files (*.*)
- Navigate and open the file “multiline_download_of_mandates[ID].xml”
- Two confirmation messages will appear, keep the default action and click OK to continue
- As a result, your mandates will be shown in Excel

Remark: you cannot perform updates in Excel and afterwards import it in Multiline
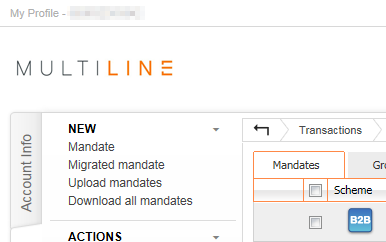
Creating new or migrated mandate
In the Manage Mandates window you have the option to create:
- A New Mandate: You can insert/create (the) new mandates for SEPA direct debit. You can find the relevant information on the mandate forms that you have sent to new debtors. They have sent back these forms signed, with their IBAN and BIC.
- New Migrated mandate: This module is designed to convert your previous mandates into European mandates (payment scheme Core).
Choose which type of mandate you want to create. Depending on your choice, the new mandate or migrated mandate wizard will be displayed.
![]()
Define mandate information
- Mandate reference: The mandate reference is something you choose, but it has to be something unique that both you (the creditor) and your customer (the debtor) can identify.
- Payment scheme: choose between Core and B2B
-
Type of payment: choose between Recurrent or One-off
Note: this option is unavailable if you are creating a Migrated mandate -
Sequence: is send to the bank notifying that a mandate is created or deleted. Therefore, it needs to be carefully managed by the creditor.
Note:migrated mandates are always set to first. When the type of payment is set to One-off this option is unavailable.- First: should only be used for the first collection of the mandate. When your SEPA direct debit is send to your bank it will provide the instructions to create the new mandate. Once your direct debit is executed you must set the sequence value to Next. If you have already performed a first collection using a third party application (ex. an upload file or a bank specific application) you have to set this option to Next.
- Next: should be for the rest of the complete life cycle of your mandate, except for the last collection.
- Final: should only be used for the last collection of the mandate. When your SEPA direct debit is send to your bank it will provide the instructions to delete the mandate. If you re-use such a mandate your SEPA direct debit will be rejected due to “mandate expired”.
Remark: if a collection is rejected by the bank, you will need to re-use the last used sequence. It is therefore advised to adapt the sequence once the collection is successful executed.
- Signature date: this is the date when the mandate has been signed. If it‘s a migrated mandate it should be the date when the original mandate was signed.
Define Debtor information
-
Former direct debit number: enter the existing direct debit number of your debtor.
Note:this options is only available when using migrated mandate - Name and address: the name and address of your debtor
- Account country: the country of the debtors account (this country can be different from the debtors address)
- Account number (IBAN): the IBAN of the debtor
- BIC: the BIC of the debtors bank account
Define Creditor information
-
Former creditor number: enter your existing creditor number.
Note:this options is only available when using migrated mandate - Creditor identifier: this is used to identify you as creditor to your bank. If you already have existing mandates you can select your previously used creditor identifiers out of the list by clicking the arrow down button.
- Name and address: enter the name and the address corresponding to your creditor identifier. This information is automatically filled in if you have selected a creditor identifier from the list.
Define mandates defaults and a personal note
- Default amount: enter a default amount for your mandate. During the creation of your SEPA direct debit you can also specify another amount.
- Default message to debtor: enter a default message for your mandate. During the creation of your SEPA direct debit you can also specify another message to your debtor.
- Note: This message can also be used as a personal note for the mandate (ex. when adding Amendments you can enter the changed data in the note)