How to create a group of payments (manage groups, using templates)
Encoding a group of payments
Managing or reviewing your group of payments
- Modify or remove a specific transaction in your group
- Modify the name of a group
- Invite potential signers
- Modify visibility options (Global debit and hide details for potential signers)
- Update all transactions in a single group (batch update)
Re-using a group of payments (save as template)
How to access
- Select the Transactions tab
- Select Group of Payments from the left navigation menu
![]()
Window overview
The group of payment wizard consists of 3 part:
-
Created groups: view the created groups and the included transactions. This section is only available once the first group is created (the amount of created groups will be visible in the title). From here you can manage your group of payments.
- Modify or remove a specific transaction in your group
- Modify the name of a group
- Invite potential signers
- Batch update all transactions in a single group
- Set a message for all beneficiaries
- Modify the execution date for the entire group
- Modify the ordering account for all transaction
- Payment Data: enter the details of a transaction
- Define additional payment data: specify the urgency, reason of payment and additional NON-SEPA instructions (cost handling, message to ordering or beneficiary bank,…)
Encoding a group of payments
When initiating a new Group of payments, you will be able to enter the first payment in your group (see the Payment wizard manual for additional information on how to enter a payment).
Once your first payment is entered, click on Next transaction to continue to create a new transaction in your group. You will notice that the counter in the title Created Groups will indicate that one group has been created.
![]()
Multiline will automatically create a new group when entering a transaction which cannot be part of an already existing group. New groups are created based on
- the ordering account
- the execution date
- SEPA/NON SEPA
- reason of payment
- urgency
To finish your group of payments, click on Finish, Sign all or Send all depending on your preference.
TIP: if you accidentally clicked on Next transaction while you actually wanted to finish your transaction you´ll notice that you cannot click finish as the transaction is not yet complete. To finish your group, simply click on the title “Created groups” and afterwards on Finish.
Managing or reviewing your group of payments
Once you have finished your Group of payments you can click on the title Created groups. The number indicates that amount of groups which are created. From here you can review the groups and the included transactions.
![]()
Modify or remove a specific transaction in your group
To modify a specific transaction in your group
- Click on the title Created groups
- Locate the transaction you want to modify
- Click on the row of the transaction or the
 icon
icon
Note: When clicked the details of the transaction will appear. Once the changes are made, click on Next transaction and afterwards on the title Created Groups to return back to an overview of the created groups and their transactions.
To remove a specific transaction in your group
- Click on the title Created groups
- Locate the transaction you want to remove
- Click on the
 icon
icon
Quickly modify the amount or message for each individual transaction in the group
In case all transactions exist, you can quickly review and modify the amount and transaction message. This can be convenient in case you are working with templates.
- Click on the title Created groups
- Locate the group for which you want to modify the transactions
- Click on the
 icon
icon - A popup will appear where you can quickly modify the amount or the message to the beneficiary
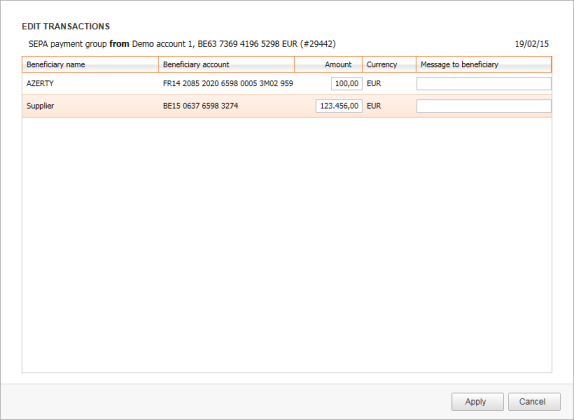
TIP: by clicking on the titles of the columns you can sort the group in this window.
Modify the name of a group
All created groups are assigned with a default name. You can modify the name to give it more meaning.
- Click on the title Created groups
- Locate the group for which you want to modify the name
- Click on the existing name

Remark: your new name can only be 64 characters long.
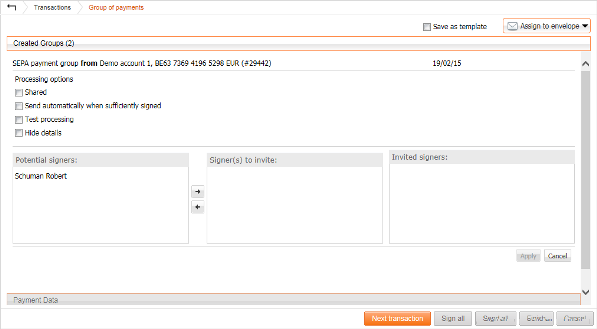
Invite potential signers
When inviting a potential signer, the invited user will receive a mail (only if the signer has configured an email address in the preferences > General) informing him a transaction is ready to be signed.
To invite potential signers
- Click on the title Created groups
- Choose Set advanced processing options

- From here you can view and invite the potential signers
Note: Multiline will automatically create multiple groups based on the transaction. In case multiple groups exists (the amount of groups is displayed in the Created groups title), you must repeat these steps for each group if required.
Modify visibility options (Global debit and hide details for potential signers)
When creating a Group of payments you are able to hide sensitive information from both the signer (hide details) as well as the user who receives the account information (global debit).
To hide the detail in your account information (which you will receive once the transaction is fully processed by the bank), you must select enable Global debit.
- Click on the title Created groups
- Enable the option Global debit
Note: Multiline will automatically create multiple groups based on the transaction. In case multiple groups exists (the amount of groups is displayed in the Created groups title), you must repeat these steps for each group if required.
To hide the details for potential signers (the signer will only be able to view the ordering account, total sum and amount of transactions), you must select hide details.
- Click on the title Created groups
- Choose Set advanced processing options

- From here you can enable the option Hide details
Note: Multiline will automatically create multiple groups based on the transaction. In case multiple groups exists (the amount of groups is displayed in the Created groups title), you must repeat these steps for each group if required
Update all transactions in a single group (batch update)
When using group of payments you can modify multiple transactions at once (batch update).
This can be done for:
- the execution date
- the message to beneficiary
- the ordering account
- the reason of payment
- the urgency of the payments
To modify update one of these items:
- Click on the title Created groups
- Choose Modify group attributes
- Enter a new Message to beneficiary or Execution date
- Click apply (a confirmation message will appear notifying you that this change will be done for all transactions in the group)
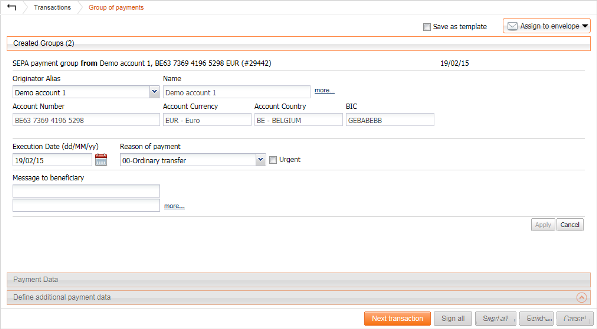
Note: Multiline will automatically create multiple groups based on the transaction. In case multiple groups exists (the amount of groups is displayed in the Created groups title), you must repeat these steps for each group if required
Re-using a group of payments (save as template)
Certain groups can occur multiple times (like wage payments). By creating a template you can save all the details of your created groups inside a template. This template can be re-used at a later point in time.
Note: All payment data is stored in the template. Therefore when changing or removing a counterparty, the template must be modified too.
Saving a group as template
You can save a group as template by enabling the option Save as template at the top of the wizard. When choosing Finish, you will be prompted to choose a new name for you template.
Using a template to create a new group
- Go to the tab Transactions
- Switch the filter to display My Templates
- Select the template you want to use
- Click on Create from template in the left menu
![]()
Modify an existing template
It is not possible to modify an existing template, however you can create a new template with your modifications.
- Create a new Group of payments based on your template (as explained above)
- Perform your modifications
TIPS: - Select the option Save as template
- Choose Finish
- You will be prompted to enter the name of your new template
The name must be different from the original template. You can use My Template v2 - Remove the original template (if you want to remove it)