How can I manage my Counterparties or beneficiaries (creating, sharing and deleting counterparties)
Creating, modifying and deleting
- Creating or modifying a (new) counterparty
- Sharing or unsharing (making private) a single counterparty
- Add or edit a beneficiary account number
- Deleting a counterparty or removing an account number
Shared and private counterparties
How to access
To access Counterparty management, go to the tab Transactions > Click in the left navigation menu on Counterparties
![]()
Creating, modifying and deleting
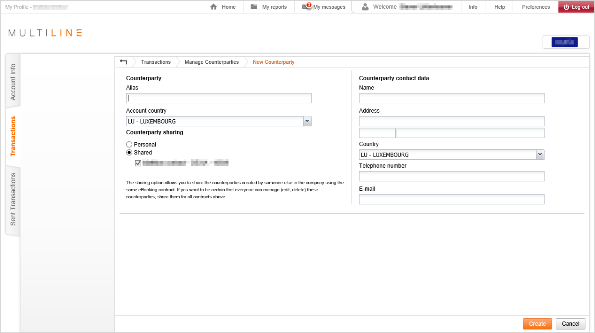
Creating or modifying a (new) counterparty
A single counterparty can have multiple account numbers from the same country. Therefore you do not need to create multiple counterparties if your counterparty has multiple account numbers from the same country.
-
Search the counterparty you want to modify or click on New Counterparty (in the left navigation menu)
- Encode or update the fields with your available data (see Sharing or unsharing a single counterparty for the sharing options)
Important fields:- Alias: an internally used name for your counterparty. If this is left blank, the counterparty name (from the right) will be used)
- Account country: define the country of the account. A single counterparty can have multiple account numbers from the same country. This field cannot be changed if the counterparty already has one account.
- Name: the name of your counterparty. This will be included in all future payments you create with this counterparty.
- Address: the address of your counterparty. This will be included in all future payments you create with this counterparty. The lay-out of the fields will change depending on the country you choose.
- Click Create to register your counterparty.
- Now you can add account number(s) to your counterparty
Sharing or unsharing (making private) a single counterparty
For more information on sharing counterparties (purpose, requirements or difference between private/shared), please review Sharing and private counterparties
- Search the counterparty you want to share
- In the details of the counterparty, choose your sharing options:
- Personal: Only you will be able to modify and use the counterparty
-
Shared: select the eBanking contracts to which you want to share the counterparty
You can only share a counterparty to (an) eBanking contract(s) to which you have access
Add or edit a beneficiary account number
You can only add an account number on an existing counterparty. See Creating a new counterparty on how to create a counterparty.
- Search the counterparty to where you want to add or modify the account number
- In the details of the counterparty, click on an existing beneficiary account or click on the Add button
Note: “Debtor direct debit order numbers” is used for direct debits, which will not be used anymore.

-
- Depending on the account country the available fields for Account number differ
- If you have the bank name or clearing code instead of the BIC you can click Search and use these fields instead (this is sometimes required for NON-SEPA payments)
- Use the fields “Defaults” to encode a default message to beneficiary or amountEncode or update the fields with your available data
Deleting a counterparty or removing an account number
- Search the counterparty
- In the details of the counterparty:
- Choose Delete counterparty in the left navigation menu to delete the counterparty.
- In Beneficiary accounts, select the account(s) numbers you want to removed and click the button Delete.
Shared and private counterparties
Purpose of sharing counterparties
Sharing counterparties allows you to make your counterparties available for everybody in your subscription. While sharing, other colleagues will be able to create payments using your shared counterparties.
Managing your counterparties
Searching a counterparty
You can search for a specific counterparty by using the search field. In this search field, you can search based on the name or alias of your counterparty.
To view the details, click on the row to open the counterparty.
TIP: The search can work with wildcards. Examples:
- Using * to replace multiple unknown characters: to find ´abcdef´ you can search for ab*f
- Using ? to replace a single unknown character: to find ´abcdef´ you can search for bc?ef
Remark: no counterparties will be displayed in case your search result returns too many counterparties.
Creating a report (print) counterparties
You can choose to create a report of all your counterparties or only the selected ones.
- Select the counterparties that you want to include in the report (or select none for all counterparties)
- Click on Create report in the left navigation menu
- Choose between Overview/details of the selected counterparties or details of all counterparties
Note: when using the TXT format, depending on your preferences the separator can differ.
Sharing all your counterparties
For more information on sharing counterparties (purpose, requirements or difference between private/shared), please review Sharing and private counterparties
- Click on Share all counterparties, in the left navigation menu
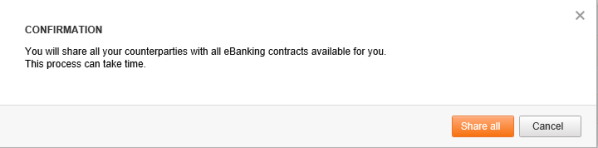
- Following options will be available
- Share all: will share all counterparties on all ebanking contracts where you have access to
- Share only already shared: will share all already shared counterparties on all ebanking contracts where you have access to
- When choosing any of these options, the popup will disappear (no additional confirmation is required)
;
Importing your counterparties
- To import your created XML file, navigation to the tab Transactions > Counterparties (in the left menu) > Upload of counterparties
- In Step 1 “Upload of counterparties”, select your XML file using the Browse button. Choose Next to continue
- A list of found counterparties will be displayed. Depending on the amount of counterparties this might take some time
- Use the first column to select the counterparties that you want to import or use the checkbox in the header to select all counterparties.
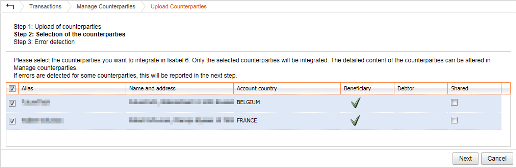
- In the next step a validation will be occur:
- If no errors occur you can click on Finish to exit the wizard.
- If errors occur, they will be listed. In the column “Error report” more information will be displayed about the error (ex. duplicates, invalid account number,…). Please review them to prevent issues is the future.